Paver Patio Installation in Queens, NY: What Homeowners Should Expect
Most Queens homeowners don’t start researching paver patios because they’re bored. They start because their backyard is sitting there, underused, and they’re finally ready to do something about it. Maybe you’ve been putting it off because you’re not sure what it costs, whether you need a permit, or how to find a contractor you can actually trust.
Those are the right questions to be asking. And the answers are more straightforward than you might think — once someone lays them out clearly. By the end of this guide, you’ll know what a proper installation looks like, what the city requires, and what separates a patio that holds up for decades from one that starts shifting after its first Queens winter.
How Paver Patio Installation Actually Works, Start to Finish
The paver installation process looks simple from the outside — stones go down, patio appears. But the work that determines whether that patio lasts 30 years or 3 happens before a single paver is laid.
It starts with a site assessment. We walk the space, check the grade, identify drainage patterns, and look at how the area connects to your home’s foundation and any neighboring properties. In Queens, where lots are often compact and houses sit close together, that drainage assessment isn’t optional — it’s the difference between a patio that sheds water cleanly and one that sends it pooling toward your foundation or your neighbor’s yard.
From there, material selection happens. Concrete pavers, natural stone, brick — each has trade-offs in terms of cost, appearance, and how they perform through New York winters. We walk you through the options based on your specific yard, not just whatever’s easiest to source.
Why the Base Is the Most Important Part of Any Paver Patio
Here’s something most homeowners don’t find out until after a bad installation: the base is responsible for almost everything. Whether pavers stay level, drain correctly, resist frost heave, and hold their pattern over time — all of it comes down to what’s underneath them, not the stones themselves.
In Queens’ climate, where January lows regularly drop to around 27°F, the ground freezes. When water gets into an inadequately prepared base and freezes, it expands. That expansion pushes pavers up, shifts them sideways, and creates the uneven, sunken surfaces you’ve probably seen in older patios around the borough. It’s not a material failure. It’s a base failure.
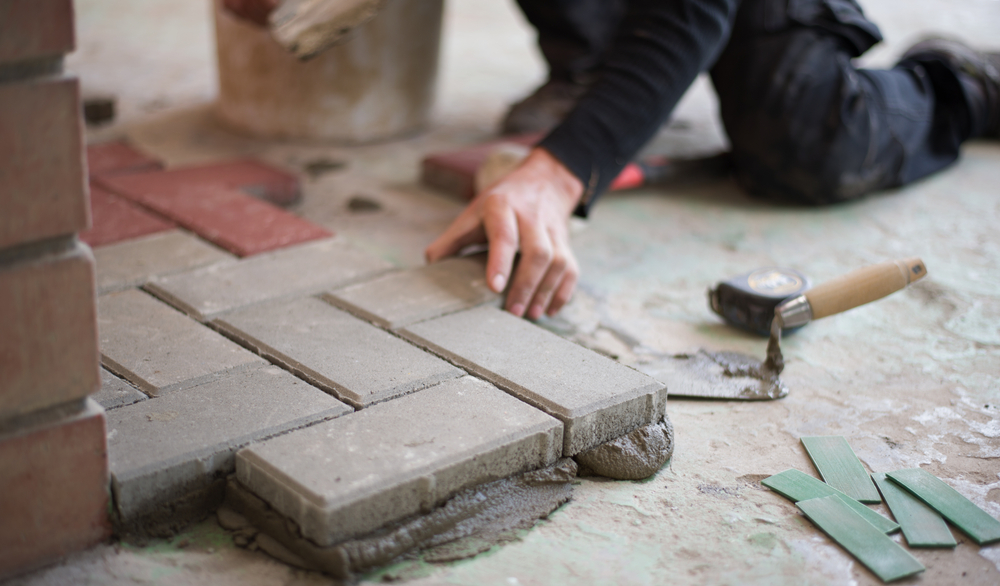
Proper installation for a freeze-thaw climate like ours requires excavating to a depth of 6 to 10 inches below the finished paver surface. The gravel sub-base goes in next, compacted in 3-inch lifts — not dumped all at once. Each lift gets compacted separately because that’s the only way to achieve the density needed to resist seasonal ground movement.
On top of that goes a 1-inch layer of screeded bedding sand, which gives the pavers a level surface to rest on and allows for minor adjustments during laying. Once the pavers are down, edge restraints lock the field in place so the pattern doesn’t migrate outward over time. Then polymeric jointing sand gets swept into the joints and activated — this is the material that prevents weeds from taking root between pavers and keeps insects from finding their way in.
Finally, a plate compactor runs over the entire surface to seat the pavers firmly and fully activate the polymeric sand. Skip any one of these steps and you’ll notice it within a few winters.
The pavers themselves matter too. We use paving stones tested to withstand forces over 8,000 psi. Standard residential concrete typically achieves 2,500 to 4,000 psi. That gap in compressive strength is a real factor in how a surface holds up under heavy use and repeated freeze-thaw cycles.
Do You Need a Permit for a Paver Patio in Queens, NY?
This is one of the most common questions we hear, and the confusion is understandable — NYC has a reputation for requiring permits for everything. The reality for paver patios in Queens is more nuanced.
A ground-level paver patio on private property generally does not require a building permit from the NYC Department of Buildings. That’s the straightforward part. But there are two things that do apply and that homeowners in Queens often don’t know about until they’re already mid-project.
First, NYC’s Zoning Resolution governs how much of your lot can be covered by impervious surfaces. Rear yard coverage limits vary by zoning district — many Queens residential zones fall under R2, R3, or R4 classifications, each with their own rules. If a patio design exceeds the allowable lot coverage for your district, it’s a zoning violation regardless of whether a building permit was required. We assess this before the design is finalized, not after.
Second, if your project involves any work that touches a public sidewalk, a curb, or a street — which can happen when a patio connects to a driveway or front walkway — a NYC Department of Transportation permit is required. This is a separate process from the DOB and has its own timeline and requirements.
One more credential worth knowing about before you hire anyone: the NYC Department of Consumer and Worker Protection requires all home improvement contractors in the city to hold a Home Improvement Contractor (HIC) license. Ask for that license number before you sign a contract. It’s verifiable, and any legitimate Queens contractor will have it on hand.
Retaining Wall Contractor Work: When Your Queens Yard Needs More Than Just Pavers
Not every Queens backyard is flat. Many properties — particularly in neighborhoods like Ozone Park, Richmond Hill, and Forest Hills — have grade changes that make a simple patio layout impossible without first addressing the slope. That’s where retaining wall work comes in.
A retaining wall holds back soil on a sloped section of yard, creating a level platform where a patio can sit. Without it, a sloped yard either gets a patio that follows the grade (which is rarely functional or comfortable) or one that’s improperly backfilled and prone to erosion and shifting. Neither is a good outcome.
The key advantage of working with us for both services is continuity. One team, one schedule, one estimate — and no situation where the patio contractor and the wall contractor are pointing at each other when something doesn’t line up.
What to Look for When Hiring a Patio Contractor in Queens
The contractor market in Queens is active, and the range in quality is wide. Homeowners who’ve been through a bad experience — a contractor who took a deposit and disappeared, or a patio that didn’t survive its first winter — know this better than anyone. So what actually separates a reliable contractor from one you’ll regret hiring?
License and insurance are the floor, not the ceiling. Verify the NYC HIC license number through the DCWP before signing anything. Confirm they carry general liability and workers’ compensation insurance. If a crew member is injured on your property and the contractor isn’t insured, that liability can fall on you. This isn’t a technicality — it’s a real financial risk.
Beyond credentials, look at how the contractor communicates during the estimate process. Do they walk the site themselves? Do they explain what they’re planning to do with the base, not just the surface? Do they put the estimate in writing with line items? A contractor who can’t explain why base depth matters for Queens winters probably hasn’t been doing this long enough to know.
Experience with local conditions is genuinely meaningful here. Queens soil, Queens freeze-thaw patterns, Queens zoning rules — these are specifics that a contractor from outside the borough, or one who mostly works in warmer climates, may not have encountered. Ask how many paver patios we’ve installed in the borough and whether we can point to work in neighborhoods near yours.
Finally, ask about what happens after installation. Can individual pavers be reset if one shifts? What does the process look like if there’s a drainage issue? A contractor who’s confident in their work will answer these questions without hesitation.
Concrete Patio Contractors vs. Paver Patios: Which Makes More Sense for a Queens Backyard?
This is a comparison that comes up in almost every early conversation with a homeowner who’s still in research mode. Both options are legitimate, and both have real trade-offs. The right answer depends on your yard, your budget, and how long you’re planning to stay in the house.
Concrete patios are typically less expensive upfront. A poured concrete surface can go down quickly and looks clean when it’s new. The problem in Queens — and this is specific to our climate — is that poured concrete and freeze-thaw cycles don’t get along well over time. When concrete cracks, which it eventually will in a market with real winters, the repair is invasive. You’re either patching (which is visible) or tearing out and repaving (which is expensive). There’s no middle ground.
Paver patios handle freeze-thaw cycles better because individual units can shift slightly and be reset. If a section of your patio develops a problem — a sinking corner, a single cracked stone — we can lift those specific pavers, correct the base underneath, and relay them. Done well, the repair is essentially invisible. That repairability is a long-term cost and quality-of-life advantage that concrete simply can’t offer.
On the value side, professionally installed paver patios consistently deliver 50% to 80% return on investment at resale. In a borough where median home values in many neighborhoods range from $500,000 to over $800,000, a patio that adds usable square footage and holds up visually over decades is a rational investment, not just a lifestyle upgrade.
Aesthetically, pavers also offer more flexibility — material type, color, pattern, and texture can all be matched to your home’s architecture in ways that poured concrete can’t replicate. For homeowners in Queens neighborhoods with older or more distinctive housing stock, that matters.
The honest answer is that for most Queens backyards, pavers are the better long-term choice. But if budget is the primary constraint and the yard has straightforward drainage, concrete can be a reasonable option — as long as you go in knowing what you’re trading off.
Ready to Start Planning Your Queens Paver Patio?
A well-installed paver patio is one of the few home improvements that pays you back in two directions at once — in daily use and in resale value. But the word “well-installed” is doing a lot of work in that sentence. The base preparation, the drainage slope, the material selection, the zoning compliance — none of it is complicated once you understand it, but all of it matters.
Queens backyards are too valuable to hand off to a contractor who’s going to skip steps on the sub-base or ignore your lot’s drainage pattern. The work that holds up through ten winters is the work that was done right the first time.
If you’re ready to talk through what a patio project would actually look like for your property — what it involves, what it costs, what the timeline is — Grey-Ruso Construction Corp. offers free on-site consultations and detailed written estimates with no hidden fees. Reach out and we’ll start with a real conversation about your yard.
Categories: Tips